Earth Spirit é um herói versátil e altamente impactante no Dota 2, conhecido por sua capacidade de controlar as lutas em equipe e mudar o curso da batalha em um instante. Com um conjunto de habilidades diversificado que inclui desabilitadores poderosos e ferramentas de mobilidade, dominar Earth Spirit pode aumentar significativamente sua capacidade de influenciar o resultado dos jogos. Neste guia, vamos nos aprofundar nas complexidades de jogar Earth Spirit de forma eficaz e fornecer dicas para maximizar seu impacto no campo de batalha.
Continue readingОтзыв об STYLUS.UA
Опыт попкупки в интернет-магазине STYLUS.UA
Начну историю с того, что ранее я уже пользовался этим интернет-магазином.Покупал там кофемолку, весы электронные и Apple iPhone 13, и это чудо, эти товары не сломались или не были крадены или “refurbished”.
В чем же проблема и причина привлекательной низкой цены в интерент-магазине STYLUS.UA.
Continue readingMicrotask vs Macrotask
Microtasks & Macrotasks are parts of big queue in event Loop what always works and listen the browser.
Makrotask are tasks which preformed by Javascript Event Loop engine. Such as script execution, events handling (mouseover,click, onkeypress ..) async functions like setTimeout.
Microtasks are tasks created by Promises and executing with .then/catch/finally methods.
And the winner is Microtasks It will be executed immediately after Macrotask.

Debouncing vs Throttling
What does it mean in programming or developing?
All this two approach provide restrictions for immediately run actions .
Continue readingJavaScript export/import ways
There’s 3 way to do it, all have a difference.
Named Export/Import (example)
//File where are You export some variable
export const name ='some string value';

//File where are You Import
import {name} from "..."
Mandatory :
In Export Module File after word “export” should be name of variable; (without name of variable you will get error, because it’s Named Export – so there should be name!
In Import file after word “import” should be curly braces it´s point out that You want to import exactly that variable name from source ‘…’
‘…’ (three dots) should be the path to file, it’s used just for example, in Your case it will be the path to directory where Your file has been saved for exp. “./Folder/fileName”
Continue readingVueJs/Webpack : Loading chunk files failed
If you are using vuejs app in nested folder and you have chunked files – probably you could get this error:

Error: Loading CSS chunk chunk-4f730675 failed.
(css/chunk-4f730675.ba84c417.css)
at HTMLLinkElement.i..i..n..e.push.i..h.onerror
It could be css or js chunk files
Error causing in webpack/bootstrap script in production build.

To solve this problem we need to understand:
Why script try to load chunk files with async request? Why we have chunk files?
Because You used Grouping Components in the Same Chunk by Vue Router
so for solving this issue – you shouldn’t use this approach!

Can we disable chunk files?
Just fix your Routes, using this approach to build your routes:

Symbolic link in linux
For example if You need to create symbolic link for your virtual host config in Nginx – web server just write this:
ln -s /etc/nginx/sites-available/example.conf /etc/nginx/sites-enabled/
Where /etc/nginx/sites-available/example.conf is path to your original file and /etc/nginx/sites-enabled/ – path to directory where do you want to place Symbolic link, without filename!
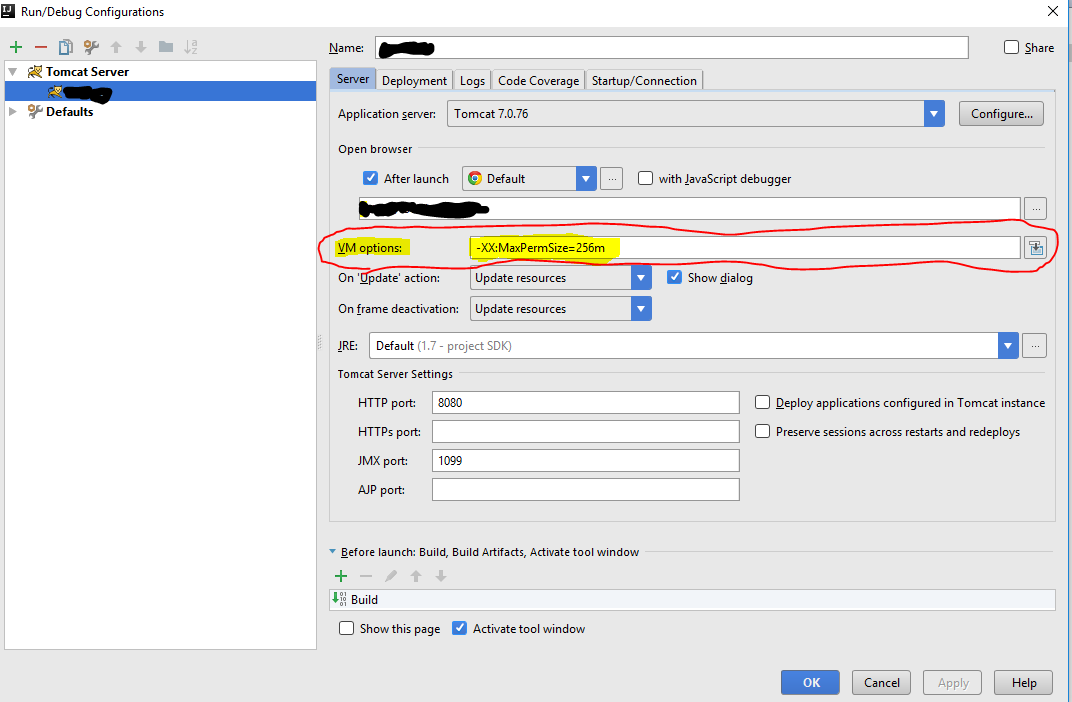
java.lang.OutOfMemoryError: PermGen space
Windows: how to kill (terminate) task/process
Open Command Prompt:
taskkill /f /pid 000
000 – it’s pid number of process ( You can see it when type tasklist );
Setup Redmine on Ubuntu with nginx webserver.
If You have already configured Nginx server on Ubuntu with php back-end, but You need to setup Redmine bug-tracker, you need Setup another environment and one of the is “Phusion Passenger” which better to setup in current situation in Stand-Alone mode.
Config for Virtual Hosts in /etc/nginx/sites-available:
  map $http_upgrade $connection_upgrade {

        default upgrade;

        ''      close;

    }
server {
listen 80;
server_name www.foo.com;
# Tells Nginx to serve static assets from this directory.
root /webapps/foo/public;
location / {
# Tells Nginx to forward all requests for www.foo.com
# to the Passenger Standalone instance listening on port 4000.
proxy_pass http://127.0.0.1:4000;
# These are "magic" Nginx configuration options that
# should be present in order to make the reverse proxying
# work properly. Also contains some options that make WebSockets
# work properly with Passenger Standalone. Please learn more at
# http://nginx.org/en/docs/http/ngx_http_proxy_module.html
proxy_http_version 1.1;
proxy_set_header Host $http_host;
proxy_set_header Upgrade $http_upgrade;
proxy_set_header Connection $connection_upgrade;
proxy_buffering off;
}
}
I recommend create own file for example (passenger) and put it in directory
/etc/nginx/sites-available with symbolic-link
to /etc/nginx/sites-enabled by this command:
ln -s /etc/nginx/sites-available/passenger /etc/nginx/sites-enabled/passenger


How to lunch Phusion Passenger web server?

First of all You should go to Your application folder
where placed root files of Your application in current situation
 it's Redmine root directory,
after start process in background by this command:
# Start foo on port 4000
$ cd /webapps/foo
$ passenger start –daemonize –address 127.0.0.1 –port 4000
# Start bar on port 4010
$ cd /webapps/bar
$ passenger start –daemonize –address 127.0.0.1 –port 4010
Link: Original article
